New Baby Checklist

Baby no2 is now 5 months old and we’re finally settling in to the new normal.

Living in London, it’s quite unusual to find someone at the age of 29 like myself, with two children already. I’ve been the first of a lot of my friends to have any children at all. To my great pleasure though, baby bumps are sprouting all over the place now and I’m very pleased to offer tips and parenting tidbits to my blossoming friends.

I find the most popular thing I’m asked is for a list of things you need to get in preparation for a newborn.

So today’s post is a…

The following is by no means a shopping list of essentials but more a checklist of the things I needed and found made life a lot easier.
You’ll prob find that quite a few things can be borrowed or you can refer to the list for family and friends to buy gifts from.

Hospital bag:

I find that nhs website has quite a thorough checklist for this:

At home:

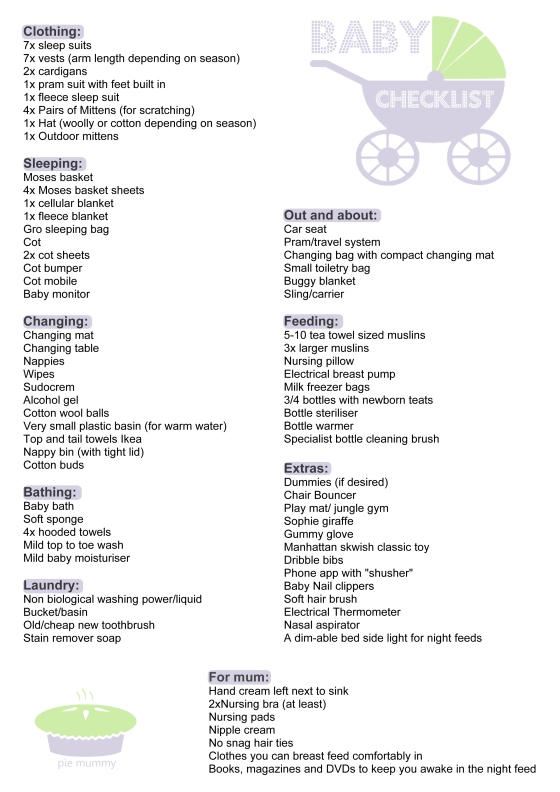
Clothing:

7x sleepsuits
7x vests (arm length depending on season)
2x cardigans
1x pram suit with feet built in
1x fleece sleepsuit
4x Pairs of Mittens (for scratching)
1x Hat (woolly or cotton depending on season)
1x Outdoor mittens

Sleeping:
Moses basket
4x Moses basket sheets
1x cellular blanket
1x fleece blanket
Gro sleeping bag *1
Cot
2x cot sheets
Cot bumper
Cot mobile
Baby monitor

Changing:
Changing mat
Changing table*2
Nappies
Wipes*3
Sudocrem
Alcohol gel
Cotton wool balls
Very small plastic basin (for warm water)
Top and tail towels ikea *4
Nappy bin (with tight lid)*5
Cotton buds*6

Bathing:
Baby bath
Soft sponge
4x hooded towels
Mild top to toe wash
Mild baby moisturiser

Laundry:
Non biological washing power/liquid*7
Bucket/basin*8
Old/cheap new toothbrush
Stain remover soap*9

Out and about:
Car seat
Pram/travel system
Changing bag with compact changing mat
Small toiletry bag*10
Buggy blanket
Sling/carrier*11

Feeding:
5-10 tea towel sized muslins
3x larger muslins*12
Nursing pillow
Electrical breast pump
Milk freezer bags
3/4 bottles with newborn teats
Bottle steriliser
Bottle warmer
Specialist bottle cleaning brush

Extras:
Dummies (if desired)
Chair Bouncer
Play mat/play gym
Sophie giraffe
Gummy glove
Manhattan skwish classic toy
Dribble bibs
Phone app with “shusher”*13
Baby Nail clippers
Soft hair brush
Electrical Thermometer
Nasal aspirator
A dim-able bed side light for night feeds*14

toys

For mum:
Hand cream left next to sink
2xNursing bra (at least)
Nursing pads
Nipple cream
No snag hair ties
Clothes you can breast feed comfortably in
Books, magazines and DVDs to keep you awake in the night feed

You can also click HERE for a pdf printable of the list.

Baby checklist

Notes:

1* In the first few weeks you might feel more comfortable using blankets but I find that when they start moving around more gro bags are good for keeping them covered all night. You can use them from newborn.

2* essential I think for csection mums and probably better for your back anyway.

3* in the first weeks it’s recommended to use cotton wool and warm water as it’s milder on the skin. You can buy water wipes which are 99.9% water based. When buying wipes I recommend buying in bulk and supermarket brands are just as good if not better. Also try get wipes that have the clicking lid to keep wipes from drying out. My favourites have been asda fragrance free ones.

4* a large pack of colour tagged face cloth like towels. I use the blue/green ones for cleaning faces and the yellow/orange ones for drying after first nappy changes and shielding me from unexpected pee shooting little willies!

5*you can buy specialist nappy bins with built in nappy bag lining to control the smell. These can be expensive. We had them with our first baby and with the second we still have the same bin but just use supermarket basic value disposable bags that are less than 20p for 100.

6*for gently cleaning around belly button as umbilical chord heals and detaches. I would use cooled lukewarm boiled water with a little salt. Dip in cotton buds to water and clean around the chord. Don’t rub hard! Just wipe gently enough to remove excess blood etc. Allow to dry and fold down nappy at the front a little to avoid rubbing.

7*having had two children with sensitive skin and eczema I know not to put fabric softener into their clothes wash. You may be tempted because of the lovely smell and the softness of the clothes but the chemical will be more of an irritant. Try also buy the best brand you can. Wash the rest of your household laundry separately and in whatever you like to keep costs down.

8* for dealing with washing and soaking of poop explosions.

9* I like to use a pre wash stain remover rather than an in wash one so that it can be rinsed off before put in the washing machine for less irritating chemicals.

10*with one baby you can get away with having a small toiletry bag that you keep in your buggy at all times for small trips out to the shops. A larger bag may be needed for longer day trips away and for older or bottle fed babies.

11*I used a moby fabric sling for both my kids. It was soft, snug, warm with breathable fabric. They were very content to be there as it kept them very close to my body warmth, heart beat and smell and I believe replicated the conditions of the womb as close as you can do.
It’s tricky at first to get the wrap right but once you master it, it becomes second nature.
People are fearful or suffocation with these. I’ve read up about cases where this has happened and it tends to be with babies who have colds or breathing difficulties already,who are very young and carried in the bag style lying position.
My moby sling always held my babies upright with their faces kissing distance from me with a clear breathing space between the fabric and my body. ALWAYS follow the instructions given with your sling.

12*large muslins have a multitude of uses. Draping over you while breast feeding for privacy if you require it. Hanging over buggy for shade from sun whilst still providing ventilation. A cool loose cover for the baby in the heat. A light weight transportable large play mat for them to roll around on at other people houses.

13*I use an iPhone app that can record feeds, pumps, dirty nappies etc. I think it might be reassuring app for those with tricky feeding babies so you can see how they are doing but I don’t recommending getting too obsessed with recording everything if your baby is thriving.
The part of this app we use the most in our house is the “shusher”. It’s a noise making function that makes either a white noise or running water sound. It’s supposed to replicate the amniotic fluid of the womb and reassure the baby. If you have the white noise on loud it also creates a noise that is so distracting for baby they cannot concentrate on anything else and it then calms them down if they are distressed. Both send my baby boy off to sleep in minutes when he’s struggling, if I place it next to him in the cot or pram at nap time.

13*a dim-able bedside light has been one of my best investments for feeding in bed. It allows you to maintain night time mode so the baby doesn’t wake up too much and think its day light. It also doesn’t disturb your partner (even if you actually want to kick them up the arse for being so soundly asleep when you are awake). We use a Lumie alarm clock and light that’s also good for S.A.D as the bulb has got a good gradient from dark to light. You can also set it off when you’re giving your bedtime feed so that it gradually dims as you do so.

Charlton Christmas Chutney

As promised here is a second installment to my Christmas themed entries. Today is a recipe of an old classic but with my own personalised packaging, much like my Chocolate Truffle Gift Jars post which were also presented in recycled baby food jars. A perfect little gift of…

Charlton Christmas Chutney

large jar

(Incase you didn’t know already, my surname is Charlton, hence the name of the post).

I will admit that I am a novice chutney maker so I have cheated slightly by getting some inspiration from various books. But then again, I don’t believe you can be completely unique when it comes to this kind of chutney as its so simple and to be Christmassy you have to stick to traditional spicing. I do think I’ve played around enough with flavours to brand the family name!

The recipe fills about 8 x 250ml baby jars or 4 x Ikea’s smallest rubber sealed jars.

Make sure that the jars and lids are thoroughly cleaned in hot soapy water, rinsed and left to dry in a oven of 150c for at least 15 mins. Making sure that they do not touch in the oven. As this is a hot recipe you need your jars to be hot from the oven to stop the glass shattering. So have your jars in the oven 15 mins before you chutney is finished. Also, if you can have a small extra jar for any extra chutney you make as it will be too late to sterilise anything when you begin to transfer things.

**I wasn’t quite sure about putting the rubber bands from the Ikea jars in the oven, so I washed these in soapy water and then left them in a bowl of boiling water for 5 mins**

Ingredients

Ingredients

For the chutney:

  • 800g of cooking apples, peeled, cored and chopped
  • 1 medium red onion, chopped
  • 500g fresh cranberries
  • 250g pitted dates, chopped in three
  • 2 satsumas/clementines
  • 400g caster sugar
  • 1/2 tsp ground cloves
  • 1 tsp ground ginger
  • 1 1/2 tsp ground cinnamon
  • 1/4 tsp cayenne pepper (optional)
  • 250ml white wine vinegar
  • 250ml cider vinegar
  • 1 tsp table salt
  • Wax paper for sealing

You can mix you the recipe as much as you want depending on what you have in the house. I made two batches and one had plums in it that I needed to use up, it also didn’t have the cayenne pepper as my father in law is allergic. So make sure to think about that sort of thing when giving any food as a gift!

I didn’t have a large enough pot for this recipe so I split mine into two. So to begin with I combined my apples, onion, cranberries, dates, sugar, spices, vinegar and salt into a bowl and gave it a thorough stir. Take your 2 satsumas and zest them over your bowl. Cut in half, squeeze in the juices and then scrape the pulp in also. Give everything another stir and than transfer into your two large pans, or one if you have it!

Bring to a boil and then turn down to the a very low heat and leave for about a hour, stirring occasionally to check it doesn’t stick to the bottom. It’s done when the fruit is no longer recognisable.

pots

Carefully take your jars out of the oven and fill with your chutney. Seal with a piece of wax paper and leave for 1 minute then seal your lid on too. And thats your chutney done! Happy to sit unopened for 1 year!

Now for my little bit of crafting!

Before anything else, I painted my small jar lids with specialist metal and glass paint in a shimmer teal colour to cover up any old text from the baby food.

Labels

Labels

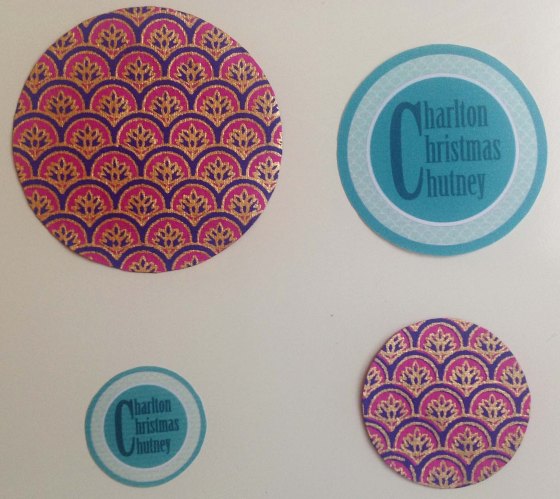
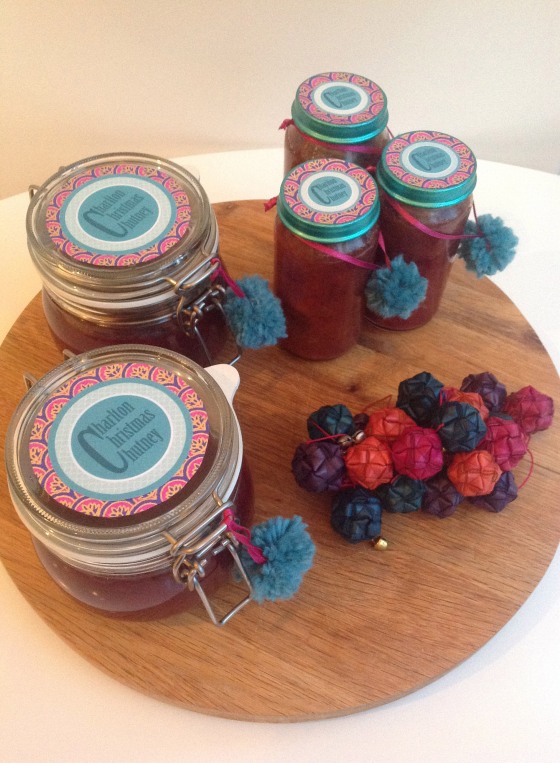
I’ve decided to make some personalised labels and Christmas Pom poms to go on my jars to make my gifts look that bit more special than supermarket conserves. You can find printable labels in lots of places online, especiallyPinterest. I’ve done a combination of bought paper and printed labels. There are so many beautiful papers out there at this time of year, with colours that you’d never get with printing. Mine is from Paperchase and has a vivid magenta, violet and gold pattern.

Depending on the size of my lid, I cut a circle of the special paper to cover top of the lid and then a smaller printed circle with my chutney name to stick on top. If you want to keep things simple though, the paper on its own looked great with the teal edge of the lid.

Still looks good with no label

Still looks good with no label

Then for my finishing touch, my teeny tiny pompoms! The easiest cutest thing you will ever make. They can then be reused by the recipient as a Christmas tree decoration. So hopefully a little part of you will be around long after the chutney is gobble up. Aw!

Pom pom supplies

Pom pom supplies

You will need.

  • Some wool that compliments your label.
  • Ribbon that’s contrasts or matches your wool.
  • Small scissors
  • A fork
  • Crimping scissors for you ribbon (optional)

4 steps

Pom pom!

Pom pom!

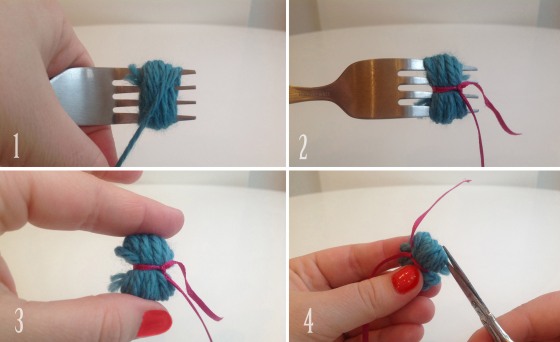
Take your wool and wrap and over lap it approximately 20 times around the centre of your fork prong. Cut a length of ribbon, long enough to wrap around your small jar or shorter to dangle from you large one. Thread you ribbon through the centre prong of your fork and tie the ribbon as tight as possible into a double knot. Slip the wool off the fork and snip down the tow edges to get your fluffy Pompom.

Enjoy with a cheese platter or as we have been doing in our house, with a teatime cheese toasty! Yum!

Festively fabulous!

all jars

Homemade gingerbread house.

The Christmas season has arrived and with it comes a never ending list of craft and food ideas. Toddler permitting, I’m hoping to be able to make a few festive treats to show here. As I’ve mentioned before, I’m a … Continue reading

Homemade Halloween Decorations!

Well hello there, it’s been a while hasn’t it?!

Apologies for the extended radio silence, it does link directly with my baby becoming a toddler and the whole new world of walking and the customary mischief that comes with!

I suppose then, the later I left things, the more I felt the need for an amazing “come back” post and then the pressure set in and the avoidance began.

However, I could see this continuing for a long time and have decided to get back in there with a simple crafty post of…

Homemade Halloween Decorations!

Halloween Decorations

I decided to host a little Halloween party for all my baby friends at the weekend and as I always go mad for decorations at Christmas time I thought why not do the same for a Halloween party and at the same time perhaps utilise some of the same decorations.

Ghost Lanterns.

What you need.

  • Christmas tree lights
  • Paper cups (you will see I used plastic but paper is much better)
  • Pin or small nail
  • Knife/scalpel
  • Permanent black marker

Unfortunately I didn’t manage to find paper cups in any of my local shops and found that the plastic ones were a little more tricky to work with as the tend to split when you cut, so Id strongly recommend paper ones if you can.

Prick, cut, cross.

Using you pin/nail prick a whole in the top of your cup.  Use this whole to then make a cross cut with your scalpel.  Again, I couldn’t find my scalpel at the time and used a kitchen knife that was probably a bit naughty and unsafe so do as I say and not as I do again and get a scalpel!

Next with your marker pen draw on you ghostly faces.  I had 80 cups to do which took a bit of time and can be quite tedious.  I recommend have 4-5 characters that you repeat.

Faces

Take you fairy lights and poke through the cross hole and pull through, pushing back the flaps of the cross cut to secure the chord in place.  I had a 120 light string of LEDs so alternated my cups with a 1 bulb gap in between to give space for the cups.

There you have it, Christmas lights come Halloween lights!

Spooky!

Lampshade Bats.

Easiest Halloween decoration ever!

  • White Paper
  • Scissors
  • Sellotape

Bat stencil

Cut out various sizes of bats using my bat stencil provided if you click here.  Stick inside lampshades with sellotape.  The more bats the better.

Tada!

Bat Lamp!

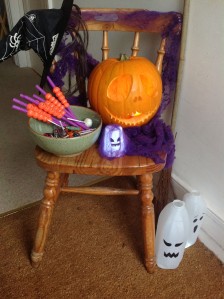
Ghost Milk Cartons.

Second easiest Halloween decoration ever!

  • Milk carton
  • Permanent black marker
  • White Floralyte

Remove your label and clean the milk out of your carton and leave to dry.  Once dry. draw on your ghostly face.  Then pop in a floralyte.  A Floralyte is a small led and battery that is used for floral displays which you can buy online here.  They are 100% better than tea lights for fire safety.  You can get ones that can be switched on and off but I have the single use ones which can last up to 3 days.  I recommend the white ones as these have the strongest light.  However, if you want colour just pop two lights in instead.

Ghostly fire safe lanterns for your doorstep etc.

Moo and Boo!


Of course no Halloween would be complete without the customary jack o’lantern  and sticking with the idea of mixing Christmas and Halloween decorations I’ve made mine the Jack from the Nightmare before Christmas! Perfect for my Trick or Treat display!

JACK!