Coronation Chicken Pizza

Unless you’ve been locked away for the past few months, you will know it’s the Queens Diamond Jubilee over the next week. So, I’ve decided to jump on the band wagon with a Jubilee recipe.

Perhaps because I’m originally from Ireland, I didn’t come across the original base of this recipe until I moved to live in England nearly 10 years ago. However, it’s been a firm sandwich filler favourite ever since.

Originally concocted for the banquet to celebrate the Queens coronation in 1953, I have created my own modern version with…

Coronation Chicken Pizza.

It’s only recently that I discovered how easy pizza is to make. I will admit, I’ve always been reluctant to attempt any recipes with yeast in. When I was younger I didn’t have much patience for sitting around waiting for things to rise but now that I am older (and a little bit more boring perhaps) I’m actually quite interested in science of it all. The fact that yeast is a living thing amazes me but the magic of a small ball of dough doubling into a billowing pillow by itself is fascinating. Geekery aside though I challenge you to find something better than a good pizza, crunchy salad and cold bottled beer outside on a summers day!

The recipe is actually more of a deconstructed coronation chicken but does contain most of the same ingredients as the original recipe by Rosemary Hume in 1953. It makes 4 large pizzas, so great for a small jubilee party. Luckily, if you only want to make one, all the ingredients are freezable, including the pizza dough.

Like with my Creamy Chicken and Bacon Pie, left over Sunday roast chicken can be used. For now though, I have followed the original 1953 method of poaching a chicken with my own choice of flavourings.

For the poached chicken you will need:

  • Whole Chicken 1.5kg
  • 1 cinnamon stick
  • 5 black peppercorns
  • 1 tsp salt
  • 1 bay leaf
  • 1.5 cm fresh ginger

Put the chicken in a large pan and fill will cold water leaving the top of the breasts out of the water. Add the cinnamon stick, peppercorns, salt, bay leaf and ginger and cover the pan. On a medium heat bring to a simmer and then reduce right down and leave to cook for 1hr 30mins.

While the chicken is cooking make the pizza dough.

Dough Ingredients

For the Pizza dough you will need:

  • 325ml Luke warm water
  • 1/2 tbsp Golden caster sugar
  • 2 tbsp extra virgin Olive oil
  • 7g sachet of fast acting yeast
  • 1/2 tbsp Salt
  • 500g Strong white bread flour
  • 2 tbsp semolina or polenta (for later)

In a measuring jug mix the water, sugar, oil and yeast together and leave for 5 mins. In that time, sieve the flour and salt together onto a clean and dry work surface, then make a large well in the centre. Dust a large bowl with extra flour.

Slowly pour the liquid in the well and using a fork gradually stir in the flour from around the well. Once combined, flour your hands and kneed the dough for few minutes. When you think the dough is formed (it will still be sticky) put into the floured bowl adding another dusting to cover the top of the dough. Cover with a damp tea towel and leave to rise in a warm place for 1 hour. (Near the cooking chicken is good but if you are preparing in advance you can leave it on a chair in front of a warm oven).

After an hour your dough will have doubled in size! Turn this out onto a floured surface and then kneed again for a few more minutes and then its ready to be used. For now though, separate into 4 equal balls, cover with cling film and place in the refrigerator (you can also freeze the dough at this stage).

*If putting in the fridge then make sure to take it out leave at room temperature for at least 15 mins before you want to to cook your pizza.

Dough Rise

Your chicken should be done by now too. Take this out of the pan and check that the juices are running clear. Leave to rest and cool on a chopping board.

Once cooled enough to handle break up the chicken into chunks and leave on a plate to cool completely.

Sauce ingredients

For the sauce and marinade you will need:

  • 1tbsp sunflower oil
  • 1/2 medium sized onion finely chopped
  • 1 tbsp Mild curry powder
  • 1.5cm chunk of fresh ginger peeled and roughly chopped
  • 2 tbsp tomato purée
  • 50ml red wine
  • 50ml water
  • 2 tsp Worcestershire sauce
  • 2 slices of lemon
  • 2 tsp lemon juice
  • 1 bay leaf
  • 5 tbsp mango chutney
  • 400g tin/cartoon chopped tomatoes
  • 1 tbsp golden caster sugar

Heat the oil in a flat based pan and add the finely chopped onions. Fry for 3/4mins and then add the ginger and curry powder and fry for a further 2 minutes.
Next add the tomato purée, wine, water, Worcester sauce,1 bay leaf, two slices of lemon, lemon juice and salt and pepper. Bring to the boil and then simmer for 10mins.
Take off the heat, let it cool a little and then add the mango chutney and stir thoroughly.
Now remove around half the mixture from the pan and set aside to cool. This will be the paste to marinade the chicken.

Add the chopped tomatoes to the rest of the mixture in the pan along with the sugar. Bring to the boil again then reduce and simmer for 15 mins stirring occasionally. Let to cool slightly before putting the mixture through a sieve into a clean bowl. We now have a smooth sauce for the base of our pizza.

Toppings

For the toppings of each INDIVIDUAL pizza you will need:

  • 30 g mature chedder cheese grated (or similar)
  • 1/2 red onion finely sliced
  • 30 g almonds
  • Pinch of ground black pepper
  • 30 g sultanas
  • 4 tbsp creme fraiche

Preheat your oven to as hot as it will go and insert the tray you will be cooking your pizza on.

*Tip – if using a baking tray turn it upside down so you can easily slide the pizza off later.

Take your marinade from earlier and extract 2 tbsp from it and set aside. In a clean bowl take your chunks of chicken and coat this with the remaining marinade.

Soak the sultanas in some boiling water for 5 minutes to make them moist.

Sprinkle a clean work surface with 2 tbsp of semolina/polenta and a large dusting on flour. Roll out your pizza dough so that it is about £1 size deep. You can use a floured rolling pin or you hands.

Take the tray out of the oven and reduce the temperature to around 180C
Transfer you dough onto your tray. Spread the tomato base evenly over the pizza, along with the marinated chicken, red onion, cheese and 1/2 the sultanas. Cook in the oven for 8-10mins.

While it cooks…

In a clean bowl mix two tbsp of the marinade with 4 tbsp of creme fraiche. Roughly chop the remaining half of the sultanas and stir into the creamy mixture. Set to one side.

Toast the almonds in a dry flat pan on a medium heat for 3 mins and remove immediately onto some kitchen paper and set aside.

Remove the pizza from the oven and scatter the toasted almonds and creamy sauce over the pizza and garnish with some coriander.

Serve with any leftover creamy sauce and toasted almonds and ENJOY!

Finished!

Homemade Cardboard Dolls House

As well as all the many joys of becoming a fulltime mum, there is the inevitable purse tightening following the loss of one salary to the household!  We have been doing fairly well so far with it all.  Thankfully, there are a lot of free things to do around London.

Over the past year I’ve been able to attend a few free baby groups in my borough of Haringey, where Isla has played with lots of babies and I’ve made some truly amazing friends.  Recently as she has gotten more inquisitive we’ve had a trip to The V&A Museum of Childhood in Bethnal Green.  This houses the largest collection of childhood toys and objects ranging from 16th Century to things we use today.  My favourite collection being its wonderful dolls houses.

I’ve always had a love for dolls houses and perhaps that’s what led me to study architecture.  I never had my own traditional dolls house.  I did have a few Barbie and Sindy interpretations but the one I remember the most fondly is the classic wooden Edwardian one that sat in the window of my great Auntie Joan’s house.  I don’t think we were actually allowed to play with it but I always looked forward to visiting my Auntie Joan if only to be able to admire it.

One of the hardest things for me being on a budget is not being able to spoil Isla with all the toys and clothing out in the shops.  Thankfully we do have extremely generous family and friends so she is far from short of either!  Even still I like the feeling of giving her something from me. So taking inspiration from our recent trip but still keeping frugal, I decided to make her a…

Homemade Cardboard Dolls House.

Completed Dolls House

Most of my architectural training has gone out the window in this exercise.  This will be for a 14 month old toddler, so she won’t notice if there are no staircases, windows or if the sofa is as big as all the kitchen units put together!

Through bulk buying a lot of nappies and wipes we always seem to have a large pile of cardboard boxes lying around the house, most of which are too small for re using as storage.  Two boxes that used to contain packets of wipes were perfect for my first try at a dolls house.

I first cut off two of the long edge flaps from one box and one from the other.  I then glued the two boxes together giving the basic two floors of my house.

Boxes

I then painted the entire outside, the side walls and top floor ceiling of the boxes and one of the previously cut off long flaps, with white paint.  Where I cut the flaps off, left the corrugated inside exposed which was difficult to paint, so for a better finish I glued some white paper over the joining point of the two boxes.  This left me with a clean white ground floor ceiling and 1st level floor.

Next I took the extra and now painted flap to make a pitch at the top of the boxes.  What was handy here is that they had already got cut outs which will make handles for easy transportation.

Painted boxes

For simplicity the house is made up of four rooms.  Living Room, Kitchen, Bedroom and Bathroom.  This made the dolls house split into equal quarters.  I then needed to cut two internal walls.  For extra support when gluing these I made sure to have two extra flaps to secure to the back wall and floor.  Because the back walls and floors of the boxes are not completely flat due to the box makeup I made the walls and flooring as panels to give a smooth finish.

Wall and Floor Panels

I happened to have some left over carpet perfect for the bedroom and living room and then I printed out some floor patterns found here.  Where you will find a fantastic selection of wallpaper patterns.  You could also choose to use wrapping paper, where the smaller the pattern the more realistic the wallpaper.  I however managed to find some fantastic origami papers that were perfect from Tiger shop, which can be found here.

Gorgeous selection of papers

I then measured and cut panels for the four back walls and two floors and then covered them with the patterned papers making sure to go over the edges of the floor plates for neatness.  I also covered the partition walls with white paper like I did the central join.

Covered walls and floors

Now for the fiddly bits…the furniture! 

I started by making the sofa.  The little figures that were going to “live” in the house are in permanent standing position so the sofa needed to be big to allow them to recline.

I made the sofa with the below cardboard net and then covered with some soft blue fabric that I had in a bag of scraps left over from my sensory play mat.  I also had a bit of sponge wadding that I covered by hand sewing for a cushioned back and seat.  Probably not necessary but I got a bit carried away!

Sofa net and completed

Next I made the lamp shades.  Using thin white card, I covered with some more of the patterned papers and then cut to size and glued into tubes.  For the ceiling pendants I glued an X shape to the top and threaded through the centre.  I then used a big needle to make a whole through the ceilings in the two rooms and then pulled through the thread with the shades attached and secured at the other side with glue.

Boxes with threaded pendants

I also used some of the leftover pieces to make a small lamp made the same way but with a smaller plain white tube for the stand.

I then made two small white tables.  The top was made from a simple 3cmx3cmx1cm open bottomed cuboid. For the legs I cut 4 3cmx2cm rectangles which I then folded down the middle and cut from the top corners to the bottom centre line to create a pointed leg.  These were then glued to the inside corners of the top.  For the living room table I glued on the lamp I had made and for the bedroom a simple folded card with a clock drawn on.

Side tables and bed

The bed was made with another cuboid covered in scrap material and then with a covered card headboard.

The kitchen units were made using two simple cuboids stuck together in an L shape with an L shape cardboard worktop on top.  I kept the finish simple by keeping the brown cardboard look and adding details with a black marker.  The finishing touches then included a covered card splashback which holds the entire kitchen together and a small extractor hood.

Bathroom and Kitchen

Finally the bathroom is made up of a bath tub which was an old piece of plastic packaging from some safety catches we had bought.  To keep the shiny affect I only painted the inside with a few coats of white paint.  The toilet was made with a small box with a piece of long thin card bent over the front and back to create a curved edge which I then topped with a flat piece of card in with the shape it created.  The sink is made of a simple box with and upturned cuboid on top, all backed with a tinfoil mirror.  The shower curtain is then a blue straw with a piece of rubber fabric threaded through.

For the exterior, I cut a large piece of cardboard to cover the front of the house which I painted white.  I then cut four 9cm x 9cm window holes to the centre of each room.  For the details I added window frames, a front door and some more of the patterned paper for blinds.

I then decided to cut some of the flaps I had left on the boxes on one side and used the other to glue as hinges to the front panel.  Finally I painted the roof green to match a pretty ribbon that I found to tie the front of the house closed.

The great thing about putting all the wall finishes and flooring onto panels and keeping all the furniture loose is that you can change everything as you like in the future.  It meant that from here in there was no more gluing, just putting the pieces together.

Et Voilà!

Finished dolls house!

Isla playing with the dolls house.

Baby Sensory Play Mat.

A few years ago I was given a sewing machine for Christmas by my lovely mother in law.  By now I had expected to be making all my own clothes with a beautifully decorated home full of my handmade curtains, blinds and throw cushions.

Well it’s been three years and I did manage to make some curtains for our living room (which still need to be hemmed) and a few cushions to match, but the sewing machine has been looking a bit sad in the spare room collecting dust!

That was until recently when I brought it back to life for a labour of love.

I recognised a gap in the market for toys for the visually impaired when I was looking for a gift for Lennie, one of my gorgeous baby friends.  So I took it upon myself to make my very own:

Baby Sensory Play Mat…

I started to make this a few months back, but you can imagine having a very inquisitive one year old, its taken some time.  But yesterday I finally finished it and here is the result!

Finished Result

I started out by sketching a few ideas for noisy toys and came up with an animal themed play mat.  Given my skills in computers, I drew this all up on CAD to give me a printable and scaleable image…

Initial CAD image.

From my computer image I was able to print templates for all my animals and pieces.

The main body of the mat itself was made by sewing together two large panels of soft blue washable (always helpful with toddlers) fleece.  Before sewing together I also machine sewed the grass fabric along the bottom of the panel that would be the front.   I then machine sewed three sides of the fleece together leaving an opening at the bottom for the same size square of wadding.  I then secured it all shut by folding in the ends and doing a double machine stitch along the bottom.

Most of the characters have a small Velcro baking so they can be removed and played with as individual toys.

The birds and squirrel were constructed by hand sewing together two identical cut pieces of fabric using the templates.  Before sewing they were each stuffed with washable wadding and a toy squeaker. The detailing included some buttoned eyes, feathers and some furry pipe wired, all bought from a craft shop.

Squeaking Feathery Birds

Squeaky Furry Squirrel

The caterpillar was made using two pairs of brightly coloured tights sewn around some bunched up wadding with crinkly plastic inside each ball (its been eating a lot of crunchy leaves), apart from the head which contained a rattle ball.  Again this was given some matching button eyes.

Crinkly Rattling Caterpillar

The Sun is made by two pieces of yellow felt with a circular piece of wadding with ribbons attached, inside. On the outside I hand stitched some clear pvc to make it feel nice and shiny.

Shiny Sun.

The rest of the pieces are not removable.

The flowers were made using the type of method found here. However the largest flower had a rattle in the centre instead of a button.  I also suggested to my friend that she spray the flowers from time to time with her own perfume that the baby might recognise.  I then stitched the bottom run of the flowers securely to the mat using my sewing machine, allowing most of the flower to be loose for rattling and pulling.

Fabric Flowers

The clouds were the easiest part as these were made from car shining pads which I sewed directly by hand to the mat.

Fluffy clouds

The tree was made by again hand stitching two pieces of fabric together with wadding inside.  This time the front piece of fabric was smaller for a nice layering effect. The bark of the tree was made using a rolled up brown toweling fabric which at the ends I cut into branch shapes and hand sewed onto my green fabric.  I then very securely sewed bells for apples onto the tree.  Be very sure you make these extra secure as these are perfect size for a baby to choke on.  I had my little girl road test it a few times to make sure!

Jingling Apple Tree

To finish I made a small handle with a button close so that the mat was easily folded away and moved around where needed.

Folded Mat

And there you have it.  Ready to be played with!

Pie!

To start things off why not pick the obvious project…pie!

I have been told that I am a pretty good pie maker.  I’ve mastered a few good meat pies and through the course of this blog I’d like to master a few more savoury ones as well as sweet.

Today I will start with an old favourite which was first concocted by a friend of mine in my university days which I have perfected over the years…

Creamy roast chicken and bacon pie.

Image

Pie!

First things first.  This is NOT for anyone on a diet and perhaps the rest of us shouldn’t eat it more than fortnightly at the least!

The recipe is for a pie with a top only and today I’ve cheated with shop bought puff pastry.  You can make your own but shop bought is far less laborious and the result is probably better anyway.  In future recipes I will however be making my own pastry!

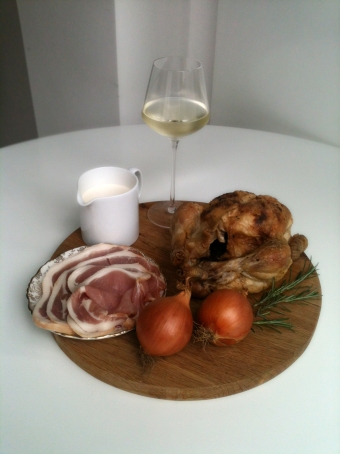
This is a good recipe for left over Sunday roast chicken and possibly turkey but today I’ve also roasted my chicken from scratch.

Roast your chicken whichever way you wish but here’s how I did mine today.

For the roast chicken you will need:

  • 1 Medium Chicken
  • A few sprigs of Fresh Rosemary
  • 3 shallots chopped into quarters
  • 4 garlic cloves roughly chopped
  • 50g salted butter cut into chunks
  • Sea salt
  • Freshly ground pepper
  • 2 tbsp Olive Oil
  • Chicken Stock

Using a sharp knife, make two small incisions through the skin at the top (neck side) of each breast, being careful not to cut into the breast itself.  With your fingers rub down under the skin through either side individually to separate from the breast meat and the skin.  Now stuff this cavity by alternating between chunks of the butter and the chopped garlic until you have covered the breast to the opening.

Rub the entire chicken with the olive oil and then season with the salt and pepper.

Stuff half shallots and rosemary sprigs in the gaps between the legs, wings and breasts and place the rest inside the chicken.

Pour half your stock into the base of your roasting tin and a quarter into the inside of the chicken where you have your shallots and rosemary.

Cook as per the instructions on your chicken.  Although as a general rule of thumb it is 20 mins per 450mg (1lb) plus an extra 20 mins at around190°C.

After the first 20 mins baste the chicken with the remaining stock and then again every 20mins with the stock and juices from the bottom of the roasting tray.

When the chicken is done lift onto a carving board and cover with tinfoil and leave to rest as you get on with the rest of the pie.

Image

Pie ingredients

For the pie sauce you will need:

  • 30g Salted butter
  • 2 medium white onions finely chopped
  • 6 Rashers of smoked bacon roughly cut into approx 2cm squares.
  • 250ml double cream
  • ¾ tbsp Plain Flour
  • 1 glass of white wine
  • Freshly ground black pepper
  • One block of ready made puff pastry (or pastry of your choice)
  • 1 egg whisked

Get a large heavy based flat pan.  Melt the butter in the pan over a medium heat.  Add the chopped onions.  Bring the heat up high for 30 secs and the turn down to a very low heat.  I use my smallest burner for this.  Spread the onions thinly over the surface of the pan and leave to soften for 12-15 mins.  Stir every 5 mins and be careful not to brown them too much.

Once the onions are softened add the chopped bacon and bring the heat up high again.  Cook the bacon until the fat starts to brown then add the glass of wine.  Still on the highest heat reduce down the liquid until it’s about half the quantity.  Once halved turn the heat down to medium heat. Sprinkle the flour evenly over the mixture and then cook for 2 mins stirring at all times.  Turn the heat down to low and stir in your cream.  Continue to cook on low for 3-4 mins as the cream thickens.  Turn of the heat and leave to one side to cool and allow the cream to soak up the flavours.

By now your chicken should have cooled enough to handle.

With your hands, break up as much of the meat as you can.  Break into medium thick flaky bits.  Its always very tempting to just eat the delicious roast chicken here but control yourself, it’ll be all worth it in the end trust me!

Image

Flaked Chicken.

Once you’ve stripped the bird completely add the chicken to the creamy mixture and season with pepper to taste.  The smoked bacon should give the mixture all the saltiness it needs.

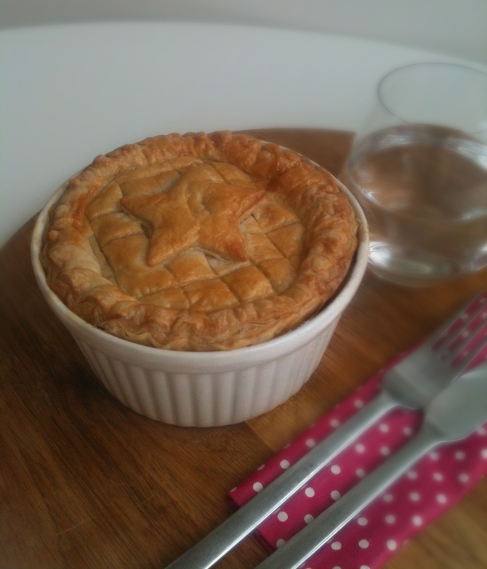
Cut the pastry top to size to just bigger than the size of the dish you are using. Decorate the pastry how you wish including any pastry you might have left over.  To finish score the pastry and add two air holes by cutting completely through the pastry with two small cuts in the middle of the pie.

Image

Filled and pastry topped dish.

The filling of the pie is now cooked so we just need to cook the pastry top.  For puff pastry I give this 30-35 mins at170°C(fan assisted).

Serve with green vegetables and enjoy!

Image

The finished result!