As well as all the many joys of becoming a fulltime mum, there is the inevitable purse tightening following the loss of one salary to the household! We have been doing fairly well so far with it all. Thankfully, there are a lot of free things to do around London.
Over the past year I’ve been able to attend a few free baby groups in my borough of Haringey, where Isla has played with lots of babies and I’ve made some truly amazing friends. Recently as she has gotten more inquisitive we’ve had a trip to The V&A Museum of Childhood in Bethnal Green. This houses the largest collection of childhood toys and objects ranging from 16th Century to things we use today. My favourite collection being its wonderful dolls houses.
I’ve always had a love for dolls houses and perhaps that’s what led me to study architecture. I never had my own traditional dolls house. I did have a few Barbie and Sindy interpretations but the one I remember the most fondly is the classic wooden Edwardian one that sat in the window of my great Auntie Joan’s house. I don’t think we were actually allowed to play with it but I always looked forward to visiting my Auntie Joan if only to be able to admire it.
One of the hardest things for me being on a budget is not being able to spoil Isla with all the toys and clothing out in the shops. Thankfully we do have extremely generous family and friends so she is far from short of either! Even still I like the feeling of giving her something from me. So taking inspiration from our recent trip but still keeping frugal, I decided to make her a…
Homemade Cardboard Dolls House.

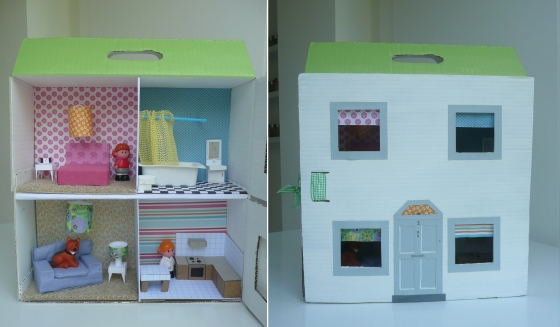
Completed Dolls House
Most of my architectural training has gone out the window in this exercise. This will be for a 14 month old toddler, so she won’t notice if there are no staircases, windows or if the sofa is as big as all the kitchen units put together!
Through bulk buying a lot of nappies and wipes we always seem to have a large pile of cardboard boxes lying around the house, most of which are too small for re using as storage. Two boxes that used to contain packets of wipes were perfect for my first try at a dolls house.
I first cut off two of the long edge flaps from one box and one from the other. I then glued the two boxes together giving the basic two floors of my house.

Boxes
I then painted the entire outside, the side walls and top floor ceiling of the boxes and one of the previously cut off long flaps, with white paint. Where I cut the flaps off, left the corrugated inside exposed which was difficult to paint, so for a better finish I glued some white paper over the joining point of the two boxes. This left me with a clean white ground floor ceiling and 1st level floor.
Next I took the extra and now painted flap to make a pitch at the top of the boxes. What was handy here is that they had already got cut outs which will make handles for easy transportation.

Painted boxes
For simplicity the house is made up of four rooms. Living Room, Kitchen, Bedroom and Bathroom. This made the dolls house split into equal quarters. I then needed to cut two internal walls. For extra support when gluing these I made sure to have two extra flaps to secure to the back wall and floor. Because the back walls and floors of the boxes are not completely flat due to the box makeup I made the walls and flooring as panels to give a smooth finish.

Wall and Floor Panels
I happened to have some left over carpet perfect for the bedroom and living room and then I printed out some floor patterns found here. Where you will find a fantastic selection of wallpaper patterns. You could also choose to use wrapping paper, where the smaller the pattern the more realistic the wallpaper. I however managed to find some fantastic origami papers that were perfect from Tiger shop, which can be found here.

Gorgeous selection of papers
I then measured and cut panels for the four back walls and two floors and then covered them with the patterned papers making sure to go over the edges of the floor plates for neatness. I also covered the partition walls with white paper like I did the central join.

Covered walls and floors
Now for the fiddly bits…the furniture!
I started by making the sofa. The little figures that were going to “live” in the house are in permanent standing position so the sofa needed to be big to allow them to recline.
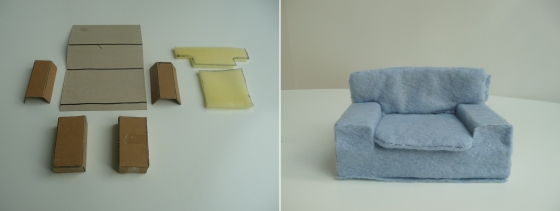
I made the sofa with the below cardboard net and then covered with some soft blue fabric that I had in a bag of scraps left over from my sensory play mat. I also had a bit of sponge wadding that I covered by hand sewing for a cushioned back and seat. Probably not necessary but I got a bit carried away!

Sofa net and completed
Next I made the lamp shades. Using thin white card, I covered with some more of the patterned papers and then cut to size and glued into tubes. For the ceiling pendants I glued an X shape to the top and threaded through the centre. I then used a big needle to make a whole through the ceilings in the two rooms and then pulled through the thread with the shades attached and secured at the other side with glue.

Boxes with threaded pendants
I also used some of the leftover pieces to make a small lamp made the same way but with a smaller plain white tube for the stand.
I then made two small white tables. The top was made from a simple 3cmx3cmx1cm open bottomed cuboid. For the legs I cut 4 3cmx2cm rectangles which I then folded down the middle and cut from the top corners to the bottom centre line to create a pointed leg. These were then glued to the inside corners of the top. For the living room table I glued on the lamp I had made and for the bedroom a simple folded card with a clock drawn on.

Side tables and bed
The bed was made with another cuboid covered in scrap material and then with a covered card headboard.
The kitchen units were made using two simple cuboids stuck together in an L shape with an L shape cardboard worktop on top. I kept the finish simple by keeping the brown cardboard look and adding details with a black marker. The finishing touches then included a covered card splashback which holds the entire kitchen together and a small extractor hood.

Bathroom and Kitchen
Finally the bathroom is made up of a bath tub which was an old piece of plastic packaging from some safety catches we had bought. To keep the shiny affect I only painted the inside with a few coats of white paint. The toilet was made with a small box with a piece of long thin card bent over the front and back to create a curved edge which I then topped with a flat piece of card in with the shape it created. The sink is made of a simple box with and upturned cuboid on top, all backed with a tinfoil mirror. The shower curtain is then a blue straw with a piece of rubber fabric threaded through.
For the exterior, I cut a large piece of cardboard to cover the front of the house which I painted white. I then cut four 9cm x 9cm window holes to the centre of each room. For the details I added window frames, a front door and some more of the patterned paper for blinds.
I then decided to cut some of the flaps I had left on the boxes on one side and used the other to glue as hinges to the front panel. Finally I painted the roof green to match a pretty ribbon that I found to tie the front of the house closed.
The great thing about putting all the wall finishes and flooring onto panels and keeping all the furniture loose is that you can change everything as you like in the future. It meant that from here in there was no more gluing, just putting the pieces together.
Et Voilà!

Finished dolls house!

Isla playing with the dolls house.


